Call Transfers and Conferencing
VoIP - SIP
VoiceGuide supports SIP REFER transfers (RFC 3515).
'Tromboned' type transfers are also supported, where VoiceGuide will dial out on another line and connect the two calls together. Using the 2-line-conference type transfer lets VoiceGuide monitor the conversation and react to any selections made during the connection. Afterwards the conference is ended VoiceGuide can take both parties through further separate IVR scripts.
T1, E1, ISDN Trunks
VoiceGuide supports ISDN 'Two B Channel' Transfers (TBCT)
'Tromboned' type transfers are also supported, where VoiceGuide will dial out on another line and connect the two calls together. Using the 2-line-conference type transfer lets VoiceGuide monitor the conversation and react to any selections made during the connection. Afterwards the conference is ended VoiceGuide can take both parties through further separate IVR scripts.
Traditional Analog Lines and 'Robbed Bit' T1 and E1
VoiceGuide can do call transfers on traditional telephone lines in a number of different ways. Most common type of transfer is called a "hookflash transfer". To do this transfer manually from a telephone handset the operator usually just presses the 'flash' button, then dials the telephone number to which the call is to be transferred and then hangs up.
When using hookflash transfers some systems will require you to wait until the destination answers the call before being able to hang up, and some systems will require you to wait only until the destination extension is ringing before hanging up. Some systems will allow you to hangup straight away. Some systems do not support hookflash transfers at all and in such cases you'll need to make a call on another line and have VoiceGuide connect the incoming and outgoing calls together internally to route the call to a new number. These are called 'Tromboned' transfers.
The Help file's section on the Call Transfer module lists all the different ways in which VoiceGuide can do call transfers.
Before trying to get VoiceGuide to do the transfers it's best to first establish exactly how transfers can be made on your system. Note down step by step what needs to be done and what buttons need to be pressed on your system to make the transfer happen if you just use a telephone handset yourself. Once this is all established you can then go ahead and configure VoiceGuide to do exactly the same things to effect a transfer.
VoiceGuide comes with pre-programmed settings for signals which your PBX or Telephone Network uses to place calls on hold and to forward or conference calls which work for most PBXs, but your PBX / Telephone Network may require different settings. If you do not know what those signals are, you will probably need to ask your PBX supplier or call your Telephone Company.
On almost all systems the 'hookflash' (also known as 'flash') signal is used in one way or another. Hookflash is just the action of hanging up the call on-hook for a very short time and then picking up the handset again. The length of the hookflash required differs from system to system - the length used by your Modem or Telephony Card will have to match that required by your PBX / Telephone Network, otherwise the transfers/conferences will not work. If the hookflash is set too short then it will not be noticed by the PBX (the caller will just hear a short click on the line) and if the hookflash is set too long then the PBX will interpret it as a receiver hanging up and will end the call (the caller will then hear just silence or a disconnect tone) and the extension dialed afterwards may be treated by the PBX/Switch as a new call. Note that if the PBX/Switch treats the dialed extension as a new call then the dialed extension number may ring. The time of ringing can be very short (if blind transfer is used) or until the call is answered or times out (if monitored or announced transfer is used).
Most modems cannot vary the length of their hookflash, and if their default length does not match the length required by your PBX / Telephone Network then you will not be able to use that modem to transfer/conference calls.
Telephony Cards allow the hookflash length to be set by the user – ensuring that a Telephony Card can be configured to allow it to successfully perform call transfers and conferencing. This is why it is highly recommended to use a Telephony Card if your application needs to do call transfers / conferencing.
Setting PBX control strings
In VoiceGuide Script Designer click on the Edit menu and select PBX Command Strings.
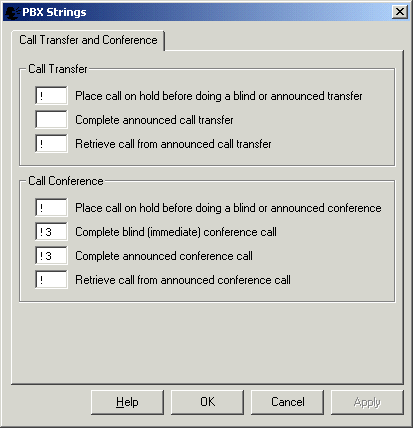
The signals sent to your PBX or Telephone Network can be configured here. VoiceGuide will generate the specified signals to command the PBX / Telephone Network to perform call transfers and conferences.
The "!" character represents a hookflash.
The screen capture above shows a typical configuration which should work for many systems. You should confirm that these settings are OK with your PBX supplier or your Telephone Company, and change them if your PBX supplier or your Telephone Company indicates that they should be changed.
After changing the PBX strings VoiceGuide will need to be restarted to read in the new settings.
If hookflash transfer is not working
If you are encountering problems performing a hookflash transfer please try the following:
Step 1 : Is it possible to do a Hookflash transfer on that line ?
Try attaching a normal analog telephone handset to the line and see if you are able to perform the transfer by just pressing the 'Flash' button and then dialing the destination extension number. If the PBX/Switch does play the dial tone after the hookflash is pressed the it is possible to perform hookflash transfers on that line. After confirming the Switch/PBX react to a hookflash try dialing the transfer destination number and confirm if the dialed number starts ringing (the original caller should be on hold all this time - and usually hearing some on-hold music). Next see if the destination extension will keep ringing if you hang up the phone. If it does keep on ringing after the party performing the transfer hangs up then it looks like you are able to do a "Blind Hookflash Transfer". If the destination extension stops ringing when you hangup the phone then it looks like on this system the destination extension needs to be answered before the extension performing the transfer hangs up - so only monitored or Announced hookflash transfers will work.
If you have verified that it is possible to perform hookflash transfers on the line you are using then you can now move onto confirming if the telephony device used by VoiceGuide is issuing the correct length hookflash.
Step 2 : Is the hookflash length correct ?
Use the VoiceGuide script to answer the original call and use the Call Transfer module to attempt a call transfer. If the hookflash is set too short then it will not be noticed by the PBX (the caller will just hear a short click on the line and will not be put on hold) and if the hookflash is set too long then the PBX will interpret it as a receiver hanging up and will end the call (the caller will then hear just silence or a disconnect tone) and then when the hookflash finishes it will be interpreted by the PBX/Switch as the line going off-hook and treated by the PBX/Switch as a new call (not a transfer), with the extension dialed afterwards just treat as a the number dialed on this new call.
Step 3 : Is the PBX/Switch correctly receiving the transfer destination number ?
It is also possible that there is not enough delay between the hookflash and the dialed extension, in which case the leading dialed digit(s) may not be detected by the PBX/Switch, so the PBX/Switch will have an incomplete number to dial. VoiceGuide leaves enough of a pause between hookflash and dialed number to not let this happen but if you think this may be occurring then you can add one or more commas before the extension number, like this:
,1234
Each comma usually represents a delay of around 2 seconds. You can also use a Play module to issue the hookflash followed pause(s) and extension number. To do a hookflash transfer to extension 1234 the following may be specified in a Play module: !,1234 or !,,1234 etc.
Setting Hookflash Length
When using VoiceGuide for Dialogic the hookflash length is set in Config.xml file, in the Parameters_DxBd section. The following section of Config.xml should be edited:
<Parameters_DxBd>
...
<Parameter>
<Description>Flash time during dialing (10ms units)</Description>
<Key>DXBD_FLASHTM</Key>
<Value>10</Value>
<Default>10</Default>
</Parameter>
...
</Parameters_DxBd>
A setting of 10 means 100ms. The setting is in 10ms units.
Setting Hookflash length on Dialogic cards using the .PRM file
You will need to change the line:
# PARAM 52:(DECIMAL WORD) 50 # Hook Flash/earth recall duration
to:
PARAM 52:(DECIMAL WORD) 10 # Hook Flash/earth recall duration
ie: remove the # at the beginning and change 50 to 10. Parameter is in 10ms units, so a setting of 10 will indicate 100ms.
Dialogic service must be restarted to read in the parameter file.